Search This Blog

Saturday, August 7, 2010

Handmade Trellis - Privacy Barriers

If you knew our house layout and our neighbor's garage placement, you would see how our bedroom window looks straight into our neighbor's garage. This alignment of windows/doors causes major problems in the evening as it is easier to see into each others' home. As our "renter" neighbor was getting ready to move, we decided to remedy this problem by building three 8 ft tall trellis. Fencing this section was not an aesthetic option as we try to blend beauty and function at all times.

Here are the steps to make your own custom trellis. 

Supplies (for each trellis):
This time we used Lowes.
2- 4x4 10' pressure treated posts
2- 2x10 8' pressure treated or untreated boards
12- 2.5" wood screws
Nails for nail gun
1/2 bag of cement
Deck Stain


Tools:  
Automatic nail gun
Screwgun
Table saw
Post Hole Digger


Cost: $130 (for all three)


Step 1:
Decide where you want to place the trellis (or trellises). The ending dimensions will be 8ft tall and 4 feet wide. We chose to stagger our trellises by placing two slightly in front of the middle trellis and also made the front two slightly smaller. Mark your placement with spraypaint or rocks. You will use these markers to dig holes when the building is finished.

Step 2:
Determine how high you want the trellis lattice to start. We chose 1 foot as our plant was going to be a climbing vine and we desired the largest amount of privacy. We also live on an incline so 1 foot of empty space at the bottom means 7 feet of lattice work .

Step 3.
Secure a 4ft section of your 2x10 (or 2x4 as we used on the bottom of our trellises) with woodscrews. Make sure your structure remains square. Once your top bar and bottom bar are secure, rip the remaining 2x10 board down to a 1" or .75" widths. You will use these strips for the lattice. Creating a "jig" (a small 4" strip of board) you can space your lattice quickly. Nail in place.

Dachshunds add excitement to all DIY projects. Adopt one today! www.dfwdachshund.com

Step 4:
Once you have finished nailing the first set of lattice strips, turn the entire structure over and attach the cross lattice to the back side of the top bar and bottom bar. Nail each strip at each cross section to create a secure fit.

At the bottom left you can see our "jig" ready to be used!

Step 5:
Once you have finished securing the remaining lattice strips, carefully lean back onto it's side. You may need more than 2 people to carry this trellis to its desired location.

This trellis was our tallest. Thank you mom and dad for all your help!


Repeat steps 1-5 for additional trellis.

Step 6:
Using post hole digger, dig your holes to a 24" depth. You may need to adjust the holes to make sure your trellis is level. Place posts into holes, set with cement.


Step 7:
After your trellis has been outside for some time, make sure the pressure treated wood is completely dry before staining with water proof stain.

The third trellis was set as it started to rain and after dark. We used supports as the cement dried.

Step 8:
Stain and add an evergreen climbing plant to provide year-round privacy and springtime bloom! Pictured here - Carolina Jasmine.

Saturday, July 31, 2010

Don't Quit Your Day Job - Finishing a Window

Even though we love to renovate and remodel, we often find that we cannot "finish" some of our projects. Some things sit on the verge of being completed for months on end. This leads me to say "Don't Quit Your Day Job" as in "It'll only take a day to finish it, so don't stop now."

In April, we removed a large section of brick from the back of our house which was pulling away from the building. We also removed old siding that was water damaged on the converted garage area. The previous owners added two french doors in the one room that was built after the garage was converted. We were often perplexed at the addition of two sets of doors in one room and decided to ditch the second. We replaced this doorway with a new window. For two months, we procrastinated about finishing the trim around our new window.

This past week, my husband decided to tackle this project and get it done! It took him 3 hours and $25.

This is the "before" - window is secure, sheetrock is secure, first coat of joint compound
Custom Windowsill made by using router
"After" window - Trim is complete (to be painted)

It All Adds Up


Before you start any project, you really ought to consider the costs. We’re Dave Ramsey fans (check him out at www.daveramsey.com) and believe in a cash only lifestyle. No credit cards, no loans. We remodel our house in a debt-free way. Which, as you can imagine, takes longer but is so worth it!

Bathroom Renovation: What have we spent and what can we expect to spend?

4 sheets of Sheetrock, 6 - 2 X 4’s, 1 sheet of Greenboard - $70 (tax included) - purchased
Antique Chest for Vanity - $138 (tax included) - purchased
Vessel Sink - $130 (will purchase online)
Faucet for Sink - $200
Paneling/Wainscotting - $100
Trim - $50
New Door - $40
Tile for floor (approx 40 sq ft @ $2.69 per sheet) - $100
Subway Tile for Shower (approx 130 sq ft @ $0.23 per tile) - $250
Special Order Glass Tile for accent (approx 12 sq ft @ $10 per sheet) - $120
Toilet - $0
Shower Head and Knobs - $75
Grout/Thinset/Underlayment for Tile - $150
Paint - $50
Light Fixture - $100
Plumbing Cost to move copper pipe to expand shower - $400

Total Estimate: $1873

White Subway Tiles
Celadon (top) Glass Tiles for Accent

Sunday, July 25, 2010

Some things in life are free...or cheap...and most of the time, old.

I think I learned at a very young age what it meant to get a bargain. My mother and I would spend hours and hours every Saturday morning scouring the papers for garage sales or estate sales, reading maps for directions, and burning gallons of gas driving the truck around town looking to get a deal. Twenty years later, I look around and realize the majority of our 2500 square foot home is filled with items that are second hand, from my family's homes, and even antique.

Three places define my home shopping:
Estate Sales
Antique Stores
Flea Markets

Successful garage sale shopping is an art and you must learn the techniques, or at least do what we do: 
1. On the one day of the week that you have zero plans, wake up at 6am.
2. Look at the ads online then insist on buying a paper..."just in case".
3. Constantly refer to houses as "Oh, we went to a good garage sale there once". And go every weekend so you can spot old signs that someone forgot to take down.
4. Heckle bad sales or mislabeled "estate sales". Make sure you chastise them for not showing you the inside of the house...since often, that's better than buying things.
5. ALWAYS stop at sales that look like they're run by art students. You'll never regret it.

I look around and do have my favorites, here's just a handful: 

Upright Piano - Free - Craigslist 
Wicker Screen - $10 - Estate Sale
Old Inlaid Wood Chair - Rumor has it my mother found it for $5 on the side of the road - $9 fabric to recover
Vintage Hoosier Cabinet - $125 - Antique Outlet
Antique Gothic Cabinet (to be vanity for remodeled bathroom) - $128 - Antique Outlet

The moral of this story is: No matter what, don't buy new.

Saturday, July 24, 2010

Sledge-swinging Saturdays

There is nothing more satisfying than swinging a hammer or better yet, a sledge hammer. Almost all projects we've started have involved some amount of demolition. Demolition day is my favorite day. Enjoy.


Here are also some sneak previews of demolition day on our past projects which you'll hear about on our blog some other day.

Removing brick flower boxes from front of house
Removing brick that was pulling away from house and replacing siding with James Hardy siding

Sunday, July 18, 2010

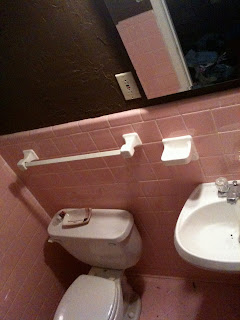
1950's Bathroom

The best place to start is the beginning but seeing as our lives are currently consumed with this bathroom renovation, we start here. Sure, we'll go back and look at the 4 months we remodeled our first home, cutting out floors, replacing the cabinets, standing on the dirt ground while in the bedroom...all those are to come.

Currently, our bedroom has one teeny, tiny bathroom attached. The bathroom is fitted with a toilet, sink, and shower. The tile is circa 1955 and pink. The shower floor is...pink...ish. As we removed the baseboards in the bedroom adjacent to the bathroom, we noticed a large amount of mold and mildew damage. So, when we removed the floors and turned on the shower, we could see the leak that must have been occurring for years. In the last three years, we've never used the bathroom connected to our room. Two weeks ago we got a sledge hammer out and tore the place apart.


Renovation Realities

If you've ever seen programming on HGTV, DIY Network, or This Old House,  then you're probably thinking "Where's MY basement?" or "Where in Texas can I find a town filled with 1700s colonial homes?" The realities are...you might be in Texas. And that's where we live. The Lone Star State.

Most homes here are older but still within the last century. We do have those few precious streets designated as "Historical Districts" with homes owned mostly by people who decide to dice up the house and call them "apartments" for local art students. But find a good 1950s-1970s home with character and we're in.

We are an average couple, with average salaries, and average know-how. We've seen the shows, read the magazines, and scoured the blogs looking for tips, ideas, and instructions on how to do just about anything. We have one set of parents nearby that are of the same "ilk". That "ilk" is the DIY fever. We live on the motto "How Hard Could It Be?" and push it to the extremes.

As we start our blogging journey, we hope you learn a lot from own tips and mistakes. So start looking around and we'll convince you that no project is too hard to tackle yourself.

We're Cameron and Erin. We live north of Dallas and we're in house #2.